Venetian Plaster Mistakes – Common issues to avoid
These are a few common Venetian plaster mistakes that you’ll want to avoid. Especially if you are just getting started or if you are troubleshooting your project, these tips will take you far as you get used to applying polished plaster.
Video
Venetian plaster’s timeless look can make it seem to be a simple task, but anyone that’s tried it knows that it’s definitely more of a technique that requires practice. That said, we also believe that it’s something even beginners can do if they have a general understanding of what to do and what to avoid. These top five Venetian plaster mistakes are easy to accidentally do if you don’t know better but likewise simple to avoid if you know what you are looking for. So continue reading to find out what five things you should make sure to avoid.
Venetian Plaster Mistake #1: Not priming your walls or surface before applying Venetian plaster
The first mistake when applying Venetian plaster is one that is easy to miss–not priming your walls or surface first. You might be tempted to just start applying your plaster without doing any prep work, and I’ll admit, it’s tempting. Priming your walls isn’t the most fun part of doing a Venetian plaster project, but it’s one that shouldn’t be skipped.
Why to Always Prime
The reason it’s important to prime your walls or surface before starting is to seal and block any paint or pigment from coming through your plaster. Venetian plaster is a porous material so especially if you are using a lighter color, old pigments can come through if you don’t adequately prime your walls first. We’ve run into this issue when we first started where the “dries clear” pink wall putty came through our plaster and in turn, we had to do another coat over that area until it was no longer visible. So really, while priming your walls before starting your Venetian plaster project may sound time-consuming, it may actually save you time by not having to mitigate issues on the back end.
How to Prime Your Walls
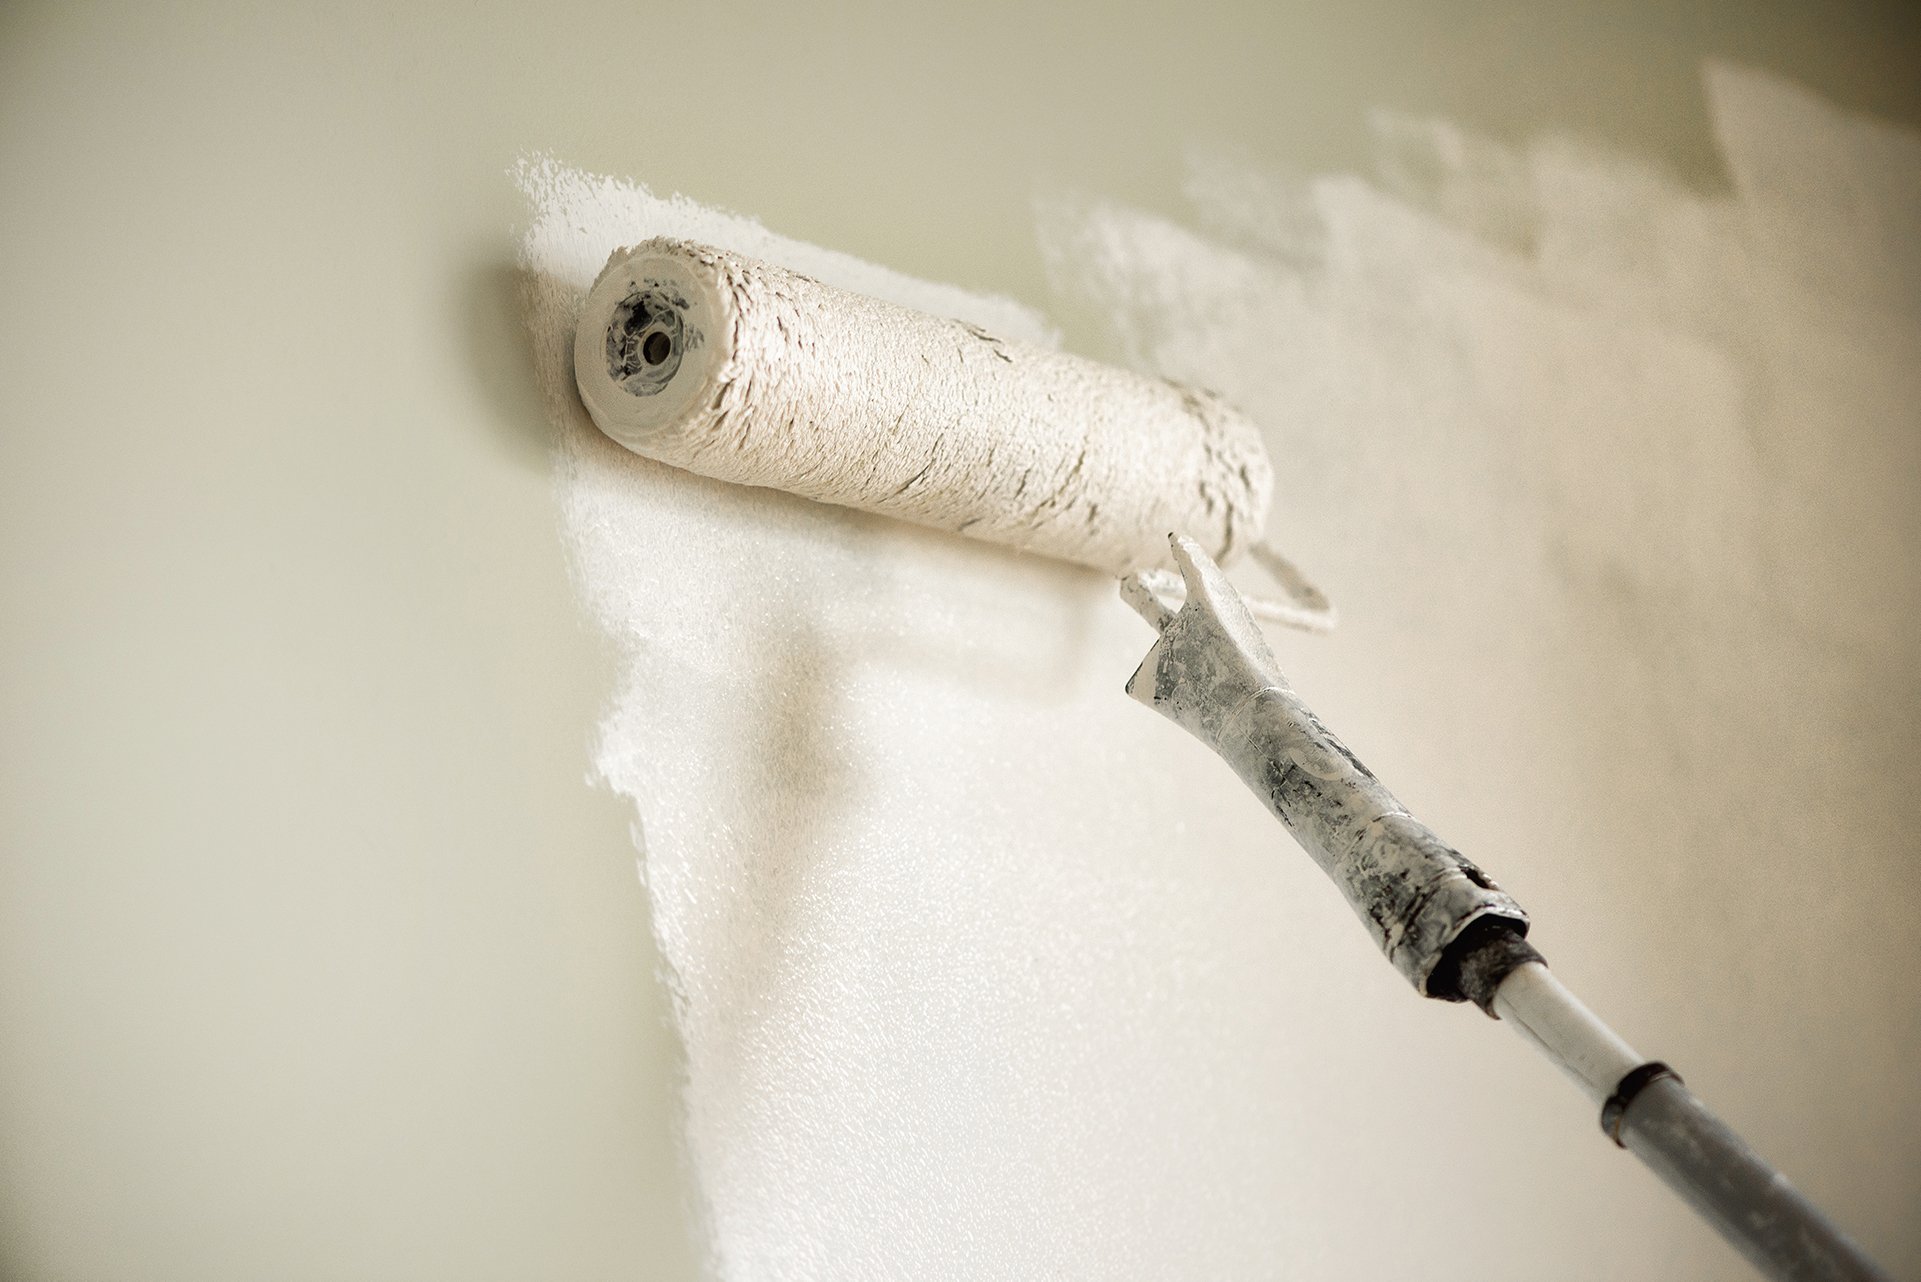
So start by priming your walls with a normal paint primer, like a Zinsser 123 or Kilz primer. These are great for blocking pigments and any sort of build-up. After priming your walls with a paint primer, you’ll want to additionally prime your walls with a Venetian plaster primer.
How to Know What Venetian Plaster Primer to Use
The type of plaster you are using, whether fine or coarse, will determine the type of Venetian plaster primer to use. For example with coarser Venetian plaster, like a Marmorino KS (our personal favorite) a primer with some aggregate is best, such as a Quartz Primer. This type of primer will feel rough to the touch once dry and will give the Venetian plaster something to adhere and grip onto. For finer plasters, like a Grassello Fino, a Novalux E can be troweled on or you can even simply opt to apply another coat of normal paint primer using a smooth napped roller.
What if my walls are new? Do I still need to prime?
We would recommend doing both of these steps, using a paint primer and then using a Venetian plaster primer, but if you have a new wall in good condition, you could jump to just the Venetian plaster primer. If you are starting with an old wall, make the extra effort and do both.
Venetian Plaster Mistake #2: Not taping off your walls and trim with painter’s tape
The second mistake to avoid is not taping off your walls and trim with painter’s tape. Now when you are painting, this is a much-debated topic. We typically fall on the side of not applying tape and just carefully edging. Venetian plaster is a bit different from painting though.
Why to Use Tape
The reason why you should use tape is that when the plaster is on your trowel it has some thickness to it, so especially when you get close to edges and corners it’s not always easy to keep the plaster off the top of your trowel and hitting your ceiling or baseboards. And when you do that, unless you wipe it off quickly, which again, you are working with plaster and trowels and the whole process is more time-sensitive, you’ll end up with dried plaster on your ceiling or baseboard. This is hard to then scrape off and paint over. We’ve tried the no tape method before, and it didn’t get clean lines and was more of a hassle afterward than it was worth. So we’d really recommend taping off your walls and trim.
Be careful to not get too much plaster on the tape
The only caveat we’d like to mention is that you’ll want to be careful that too much plaster doesn’t get on the tape, as the tape can have a tendency to break off and stay up in the corners. If we had all the patience in the world, we’d actually tape, apply the first coat, remove the tape while it’s still wet, allow it to dry, and then repeat for the second coat. This doesn’t seem very realistic though, so just be careful and do remove the tape as soon as you are done applying the second coat.
Venetian Plaster Mistake #3: Not mixing your Venetian plaster
All we have to say is, mix your Venetian plaster. Don’t convince yourself to skip this step. We’ve done this before and paid for it, big time (literally and figuratively).
Why to always mix your plaster
The main reason it’s important to mix your Venetian plaster is consistency. When you receive any kind of Venetian plaster, especially coarser varieties like Marmorino KS, even if they’ve been premixed, the consistency comes much harder and chunkier. When you mix it with a drill and mixer attachment, the consistency almost transforms. It becomes much more workable, actually physically feels less thick, and you’ll avoid having any chunks that will make applying it harder.
Pre-tinted Venetian plasters
Additionally, should you buy a pre-tinted Venetian plaster there are scenarios where it might not have been fully mixed. This also has happened to us, where a good two inches of plaster wasn’t mixed at the bottom. And really, you’d never know this was the case until after you are almost completely done applying the plaster and have reached the non-mixed material. Now not only do you have unusable plaster at the bottom but your plaster likely isn’t tinted correctly. All around a bad situation, so avoid this and take the extra time to mix your Venetian plaster with a power drill with a mixer attachment.
Venetian Plaster Mistake #4: Overworking the first coat and in turn accidentally burnishing it
This mistake is one that’s easy to accidentally do when you are first starting out– overworking the first coat of plaster and in turn accidentally burnishing it.
Why does this happen?
This is because you are likely trying to go over your first coat too many times trying to make it perfect. So if you are more of a perfectionist, this tip is one you’ll want to be conscious of. When you do this, it overworks your plaster and starts to burnish it before you even have your second coat on.
What to do
Instead, you want to apply your first coat and then move away from it, not going back into the areas you’ve already applied, especially as it dries. If you do end up with high points, or bumps after your first coat has dried, just knock it off with a knife before starting on your second coat.
Venetian Plaster Mistake #5: Plastering from wet to dry instead of dry to wet
The fifth mistake to avoid is plastering from wet to dry instead of dry to wet. Now, this is something that seems counterintuitive. It will feel like you want to apply the plaster and work from what you’ve already applied, to the areas that still need it but this will cause a whole gamut of problems.
Why to avoid
Firstly, it will leave marks in your freshly smoothed plaster. You’ll have to place your trowel in the plaster and that will leave a line. Additionally, it will also lead to the fourth mistake, as you’ll end up needing to go over your plaster too much, trying to get the issues and lines out.
The correct way: Dry to Wet
So instead, you want to place the plaster on the dry portion near where you want to go, and spread it into the wet, already applied area. If you are right-handed this will mean starting on the left-hand side of a wall or surface and working toward the right. If you are left-handed, right side to left.
Final Thoughts
Now that you know the top 5 Venetian plaster mistakes to avoid, you can start honing in your plaster application techniques or even start applying for the very first time. Work to avoid all of these Venetian plaster mistakes and you’ll happily see better results.
Video Transcript
Today I’m sharing with you the five top Venetian plaster mistakes you want to avoid when applying Venetian plaster.
[Intro]
Hey we’re Blake and Melanie! We’re on a journey to discover the things that fill life with joy, find more balance in the everyday, and even pursue some of our crazy ideas. We’re sharing our story in the hopes that it will encourage you to know yours and inspire you to go after your own big ideas. So we’re inviting you along for it all.
Hey guys, if you’re new here I’m Blake and we have more Venetian plaster content for you guys today. Make sure to subscribe, give this video a thumbs up, and also make sure to check out our playlist that has more of our Venetian plaster videos. So today we’re sharing with you our five top mistakes that we’ve made while applying Venetian plaster. These are things that are easily avoidable if you know what you’re looking for. You’re obviously going to want to avoid all five of these things but the last one completely changed the way I apply Venetian plaster, so stick around.
So our very first Venetian plaster mistake is not priming your walls. Now, this is a step that obviously is boring. It’s boring to prime your wall, it’s not very fun, you want to get right onto plastering. So our first tip is to make sure to prime your wall. The reason you want to prime your walls is if you’re going over an old wall obviously there’s paint and there’s pigment and the primer blocks that pigment from coming through and soaking into your plaster and if you’re on a new wall priming your wall helps the plaster adhere to the wall better. So the process I’d recommend for this is first priming your walls with a normal paint primer. I would suggest something like a Zinzer Bullseye 123 or there’s that Killz that works really well. I’d first start with this. These are really good at blocking any pigments and any kind of weird seeping stuff that’s in your walls. A lot of times if you have an older wall things just kind of come through. There’s already paint on the wall it’s good just to kind of go over with the primer to block all of that in. So after priming your walls with your paint primer you’re going to want to prime your walls with a Venetian plaster primer. Now, this primer is called Quartz Primer and it has a little bit of aggregate in it which means that it’s going to be rough to the touch when you put it on. It’s going to allow the Venetian plaster to have something to grip on to as you’re applying as a smooth wall might not allow the Venetian plaster to really adhere to the wall so you’re really going to want to do both of these things. Now if you have a brand new wall you can definitely just jump straight to the quartz primer, not a big deal. If you have an old wall definitely would suggest priming your wall with the paint primer first.
The next Venetian plaster mistake you want to avoid is not taping off your walls or your trim. Now this one is kind of annoying obviously nobody likes to tape off walls and it’s something that we forgot to do obviously as well so it’s definitely understandable, but it makes a big difference with how clean your lines are going to look when you’re done plastering. This is really, really important for plasters that have pigment in them so something that is not just white. Obviously white you can kind of get away with the fact that it’s not perfectly clean if you’re just doing white walls, um you know and you have a white ceiling then that’s gonna be okay but I would still recommend taping it off just so you have those super clean lines, nothing’s messy, the baseboards don’t get plaster on them. Just tape everything off it makes kind of a world of difference. I know it takes a little bit extra time but it will pay off and i’m saying this as someone who would rather not tape and just be super careful and just kind of edge in really nicely. Plaster is just a little different than paint because on your trowel your plaster you know has some thickness to it so when you go into those corners it’s not always easy to keep that plaster off from the top of your trowel and hitting your ceiling or your baseboard sometimes. The plaster drops on the baseboards, you know as much as you want to control the product sometimes things happen this is just going to prevent those things from getting on those baseboards, and on your ceiling and your trim. So i would just really recommend doing this.
The next Venetian plaster mistake to avoid is not mixing your plaster. Now I’m laughing because we’ve done this a few times where we didn’t mix the plaster ourselves and we’ve had pigment left in the bottom. We’ve had chunky plaster we’re trying to mix it up by hand– it’s just not good. You paid a lot for this plaster. It’s not very cheap, obviously as you know, so mix it up. I have a little drill mixer here this one just fits on a little handheld drill. There are bigger ones that are better if you have bigger buckets but this is just kind of handy because it’s not very bit and it’s not going to be a big investment to get and it does make a world of difference. When you get your plaster if you buy it from a pre-mixed place you’re going to still want to mix it up even though it says it’s pre-mixed. This is going to help the consistency of the plaster be a little bit smoother, it’s going to allow any of the pigment that wasn’t mixed in completely to get mixed in, and it’s going to make it super easy for you to apply because it’ll be less thick. It’ll be smooth and it’ll be ready to go.
So the fourth one is more of an accident and that is accidentally burnishing your first coat. It’s something that’s really easy to do when you’re first starting out because you’re trying to go over your first coat too many times and what that does is that overworks your plaster and starts to burnish it before you really even have a second coat on. So this is really something to avoid if you’re a perfectionist. When I started plastering I wanted things to be perfectly smooth on the first coat so I went over it a million times, thinking “oh I’m just going to smooth it out” but then I accidentally was compressing it and burnishing it and you really don’t want to do that until the second coat so this is something that you kind of got to get used to, just applying the plaster on and then letting it be. Like getting it smooth and then moving away from it so not going back into areas that you’ve already applied the plaster especially as it starts to dry you really just don’t want to touch it. So the main key here is to not overwork your first coat. If you have high points on your first coat and you want to get them off, knock it off with a knife before your second coat and then you’ll be good to go.
And our last thing to avoid and final mistake is applying plaster from wet to dry. Now this is something that seems counterintuitive, like, when you first start applying plaster you’re going to want to work from wet to dry and it just kind of makes sense. So I’m going to…I’m going to kind of show you guys here, right, so if I’m right-handed I actually want to work from my left side to my right side. The reason I want to do that is because I want to work back into the plaster I’ve done, so I always want to be working away from my plaster that I’ve already done. If you’re left-handed you’re going to want to do that in opposite, you’re going to work from right to left. So if you’re left-handed you’re going to want to be working back into your plaster right. So the tendency is, if I’m right-handed is to actually start on the right side. You want to avoid that mistake. So if I apply it here on my right side, so it’s wet here, and then I want to go over her, well now I got to start in my wet stuff and now I’m working out of my wet stuff. And the reason you don’t want to do that is if you go into your wet stuff like this you’re going to leave a line, it’s gonna leave a mark, it’s gonna be messy, you’re gonna have to go back over it this way. So if you’re always working, if you’re working the right way, which is starting in the dry spot and working back to your wet spot you’re never leaving a mark in your wet spot. So if you work off the wall kind of work off upside down like I’ve shown and then work back into it you’re always going to have those overlapping lines but never have the mark of the trowel in your wet plaster. This kind of pairs with our last mistake of not overworking your plaster if you work back into your wet plaster then you’re not going over your plaster as often for your first coat. So this is obviously a little counter-intuitive at the beginning but once you get used to it this is something that’s going to change the way you plaster and it’s going to make your outcome look a lot better and more uniform. So just as a recap you want to apply your plaster from dry to wet, always be working back into the plaster you just applied. Don’t start in the plaster you applied. So there you have it– those are our five mistakes that you want to avoid when applying Venetian plaster. Hopefully, this is helpful for you guys and if you want to see more of this content, make sure to subscribe.


Check out the before and after of our bathroom renovation. We decided to do a dark Venetian plaster for the walls and update a few of the details. We kept it pretty simple but are so happy with how it turned out…