Venetian Plaster Beginners Guide – How to Apply Plaster
Figuring out how to apply Venetian plaster can be done yourself with just a few steps and practice.

Within this detailed guide, we’ll explain everything you need to know, including how to apply Venetian plaster, sometimes referred to as polished plaster, where to get it, what tools you’ll need, and how to get started. We’ll also provide information on other alternatives to Venetian plaster, such as clay plaster, gypsum plaster, plaster of paris, tadelakt and lime paint.
Video Applying Plaster to an Actual Room
What is Venetian plaster?
Venetian plaster is typically a lime-based plaster with marble. It is used as a decorative finish for walls, ceilings, and other surfaces such as fireplaces, range hoods, and more. Although the term Venetian or polished plaster has had many different definitions over the years, today, it generally refers to a collection of plasters all mimicking plasters from Italy.
History
The origins are somewhat hidden. Some say that it can be traced all the way back to the first century in Mesopotamia. That said, it became popular in the Roman Empire. They needed a way to make wall coverings lighter because their houses were on the water and the typical building materials at the time were solid marble or stone. By grinding up marble and using limestone putty, they were able to mimic the look of their traditional building materials while making the structure lighter. Although modern Venetian and polished plasters only require a couple of coats, plaster back in the day would have consisted of many more.
Modern Plaster – Is it still being used?
Modern plaster builds upon its history while making it easier to apply and using fewer coats. Today you see plaster used in various ways, including homes and kitchens, residential spaces, and even commercial properties like shopping centers. Because it is labor-intensive, plaster is considered a higher-end finish, being used in more upscale and luxury settings. You also see this used in smaller-scale settings by using plaster as an accent, such as a single wall, fireplace, or range hood. Lately, plaster continues to be seen in interior design trends, from Jersey Ice Cream Co to Studio McGee and Ikea.
Benefits of Venetian Plaster
There are many benefits to plaster. Firstly it adds a timeless look that paint cannot offer. Depending on how it is applied, it can give a unique look to your home without being obtrusive. It is also long-lasting. Considered a lifetime finish, it requires no reapplication and should last the lifetime of a home. There are also a variety of looks that can be achieved. From smooth to textures, glossy to matte, you can do a lot with it, depending on what you like.
Eco-Friendly Wall Finish
Venetian plaster is also considered a sustainable wall finish. Made from limestone and marble, it is considered eco-friendly as it is mostly made from natural materials. It also is low VOC, meaning Volatile Organic Compounds. Additionally, Venetian plaster has a naturally high PH level giving it an antibacterial surface, prohibiting mold and fungus growth. Applying stone on your wall also provides a layer of insulation and anti-flammable properties. Further, because of its porous nature, Venetian plaster regulates humidity and absorbs carbon dioxide.
Where can Venetian plaster be used?
Venetian and polished plaster can be used in a variety of settings. Typically used on walls, it can also be used floor to ceiling, including fireplaces, floors, showers, countertops, backsplashes, and more.
Is Venetian plaster hard to do?
While more challenging to apply than simply painting, DIYers or those comfortable tackling home projects themselves can learn to apply plaster. It will take practice to learn the correct techniques to apply plaster with a trowel, so we’d recommend watching videos and then practicing on boards before your actual wall.
[Related Video: Tips for Beginners]
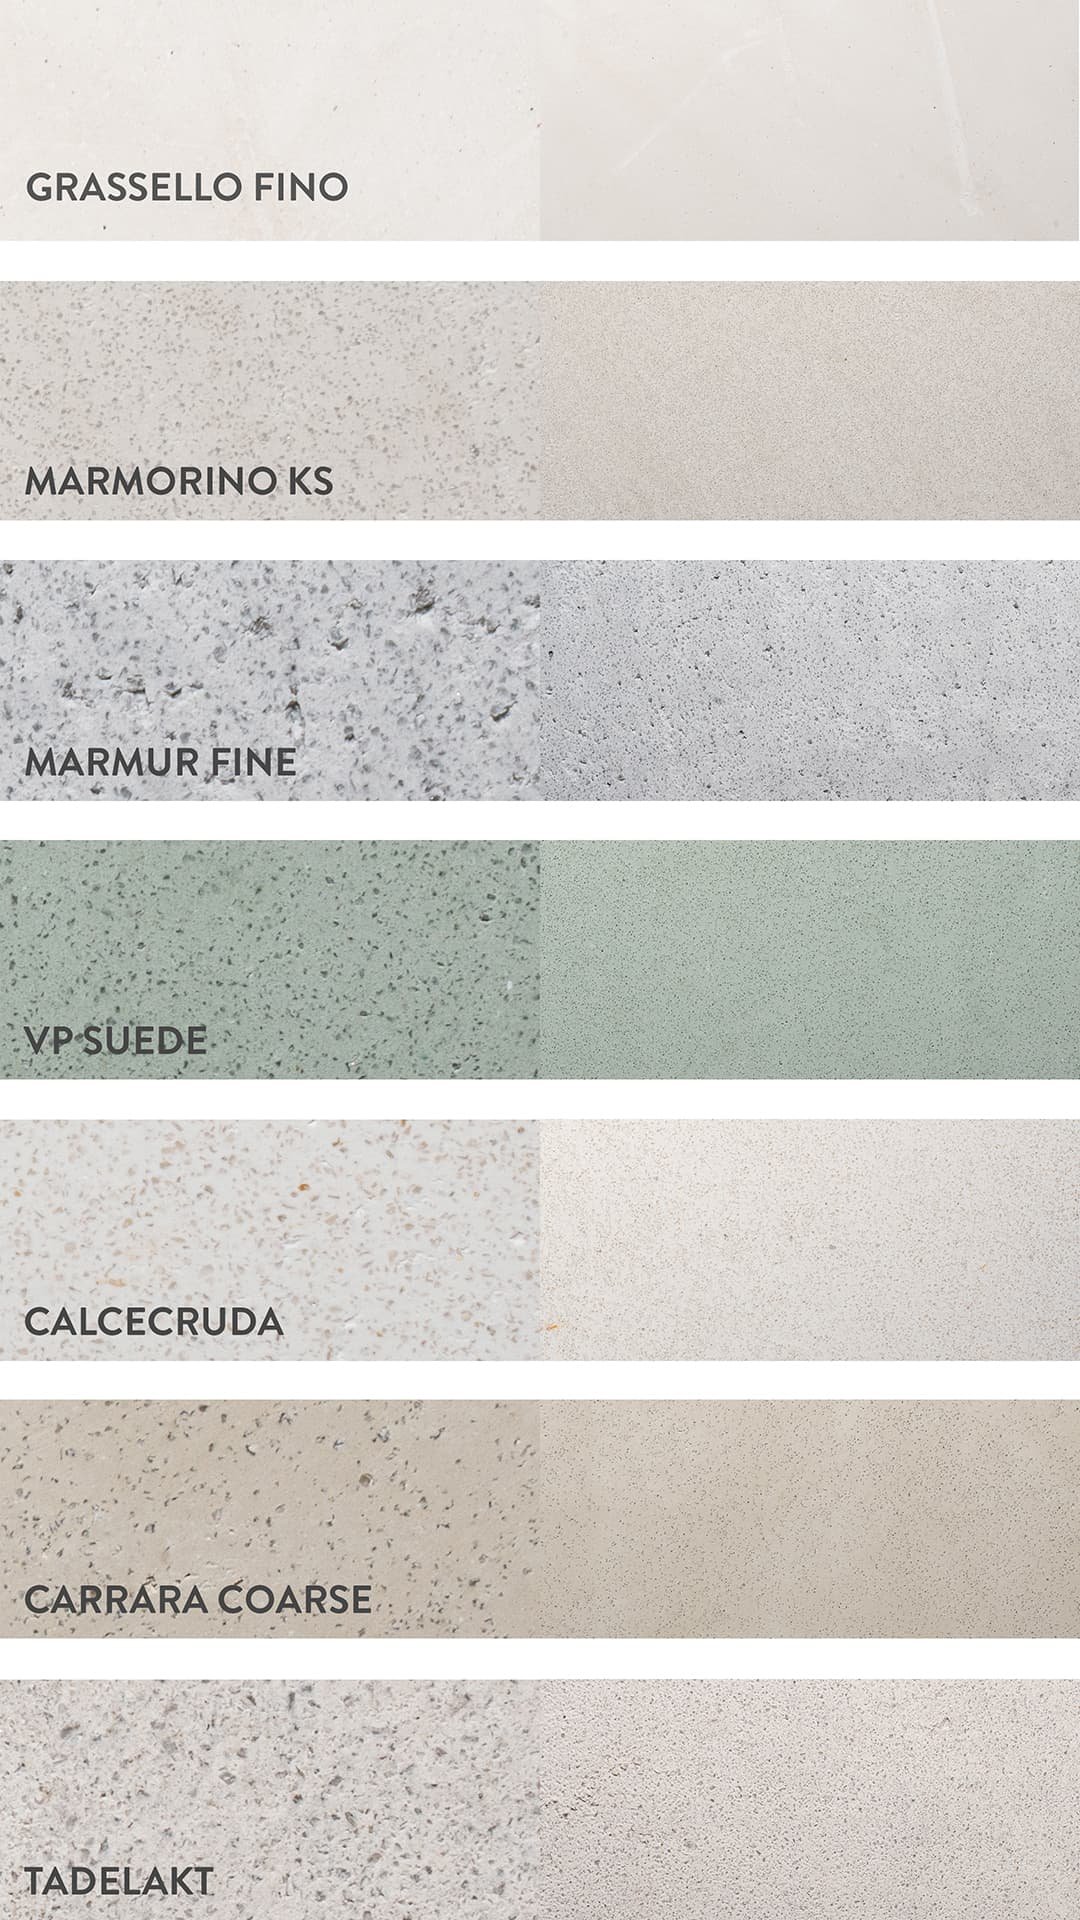
Types of Plaster
There are many types of Venetian plaster. They generally differ based on how coarse or fine the marble dust added is. These differences will give a variety of final looks, from shiny to matte.
Explore different Venetian plasters and other plaster products with our video playlist.
Venetian Plaster vs. Clay Plaster
The main difference between Venetian plaster and clay plaster is that it is using clay as the putty versus lime. There is also typically not marble in clay plaster, although marble could be added for shine in some cases.
Venetian Plaster vs. Gypsum Plaster or Plaster of Paris
Gypsum plaster, also known as plaster of paris, is typically more affordable than Venetian plaster, and is usually the main factor for choosing this option. Known mostly for it’s matte look, this cost effective option can provide the look of Venetian plaster. Venetian plaster can be polished while gypsum plasters perhaps may not.
Venetian Plaster vs. Microcement or Cement Plaster
The benefit of cement is that it can be stronger and handle more abrasion. You often hear people say they are looking for a microcement look with Venetian plaster. These materials are different but a grey tinted Venetian plaster often gives this “micro cement” look they are referring to. For example, Brad and Hailey Devine, a Youtube couple that incorporated Venetian plaster in their kitchen and living room fireplace, said they wanted a “microcement” look but that it was actually Venetian plaster. Thus while the actual product is actually different, you do hear the terms being used interchangeably.
Venetian Plaster vs. Tadelakt
The main difference between tadelakt and Venetian plaster is that tadelakt can be a waterproof finish. In general, common places you’ll find tadelakt are in showers, sinks, and bathrooms. That said, you can also use Venetian plaster in these settings, but it may require additional sealants to make it completely waterproof. Tadelakt is typically made waterproof by rubbing a small stone across the wall’s surface, creating a waterproof finish.
Venetian Plaster vs. Lime Paint
Lime paint or lime wash has recently gained popularity as a simpler alternative to Venetian plaster. Applied with a brush rather than a trowel, lime paint can create soft color variations giving a similar effect to Venetian plaster. Lime paint results in a very matte finish. In photographs, the effect is more pronounced and can look quite similar to plaster. In person, though, there is a rather distinct difference visually and by how it feels to the touch.

5 Things to Consider When Choosing a Venetian Plaster
Before you jump into the world of plaster, there are few things you should consider before you get started on your project. It’s important to consider where you will be using it, what type or how you want it to look, what color you want, if you are ready for a learning curve, and how much it will cost. You will want to answer some of these questions for yourself before getting started, as it will help you determine what type of plaster you need and if you should look at other options.
1. Where are you using it?
Determining where you are applying a plaster helps you decide what will work best for your specific situation. Different plasters offer different benefits and properties so determining your use case helps figure out what product will be best for you.
2. What type of look do you want? Shiny vs. Matte
Venetian plasters offer a range of sheen from matte to shiny. Depending on what your personal preference is, there will be many options within the matte to shiny range, each with different subtle effects.
3. What color do you want?
The simplest way to color your plaster is to have it pre-tinted by the plaster company you are purchasing from, such as Frienzecolor. They can match any standard color chip, such as Benjamin Moore, Sherwin-Williams, and others. Picking out a color beforehand helps you determine what color you want for your space and alleviates the stress of figuring out how to color it yourself or match your own colors.
4. Do you want an easy or complex project?
Determining how much effort you are willing to spend can help you decide on specific products. For example, if you are unsure how much effort you’d like to spend, lime paint or lime wash options might be better suited.
5. How much does it cost?
Plaster can have a wide range of costs depending on the product you choose. Other things that affect cost is whether it is pre-mixed or comes in a dry mix. What you pick ultimately depends on what you like and how much effort you want in preparing your product.
Where to buy Venetian Plaster
Plaster can be purchased from a variety of retailers. The best places to purchase plaster are from retailers that can import authentic plasters from Italy, such as Firenzecolor. This is the only way to get high quality plasters utilizing the age old materials from the region. There are other plasters that were created to mimic the look of Venetian or polished plaster using other materials, or creating a synthetic version.
How to apply Venetian Plaster
Plaster is typically applied with a steel trowel. There are many ways and techniques that you can apply plaster, but the classic application is generally applied in overlapping curved strokes to create depth and movement. Depending on the plaster, you’ll apply two or three coats to achieve the final look.
[Related Video: Top 5 Mistakes When Applying Venetian Plaster]
What tools do you need to apply Venetian Plaster?
The main tool in applying Venetian and polished plaster is the trowel. Other tools will depend on your workflow but these are the tools we have found to be best:
Types of Trowels
Trowels come in many shapes, but there tends to be two main categories of trowels for Venetian plaster. The first category is an application trowel, which is used to apply the Venetian plaster to the wall. The second type of trowel is a finishing trowel, or a burnishing trowel, which is used to polish and burnish the final coat of plaster. Although you can use one trowel for both steps, it is recommended to have two separate trowels. On top of these categories, there are also trowels specially treated to avoid black marks on lighter Venetian plaster, which can occur when small filaments of a steel trowel come off on a wall due to burnishing or minor unevenness.
Preparing Your Walls
Plaster is typically applied on a level 4 or 5 wall, meaning little to no texture. If your walls do have texture, it is recommended to skim coat or sand the walls to create a smooth surface before applying your plaster. Venetian plaster requires a smooth surface because texture from underlying layers will come through. A smooth finish is particularly important with finer plaster, such as glossy plasters like Grasello Fino, as its thin layers aren’t able to cover imperfections.
Priming Your Walls
After your wall is smooth, it is recommended to apply a primer to the surface to prepare for the application of plaster. For coarse Venetian plaster, the best primer will include Quartz that gives the plaster a surface to grip on to and allows for even greater adhesion. For finer plasters, a smooth primer, like a Novalux E Primer, is recommended as you want to minimize any surface texture.
Applying Your Base Coat(s)
Your first coat is called your base coat. This will build the base that you will apply your second and possible third coats on. For your first coat, you are trying to leave enough material on the surface without causing any chatter or uneven patches.
What is chatter? Why to avoid it?
Chatter is when your trowel skips along the aggregate of the plaster. This will cause a wavy effect, or small lines, that are usually not desired. Chatter can be common when you are first learning. To avoid this make sure to leave enough plaster on the wall making sure it is smooth as you move forward.
Apply in the Correct Direction
If you are right-handed typically you will want to work from left to right starting in the dry spot and working back to the wet. If you are left-handed you would work from right to left, always starting in the dry spot and working back to the plaster you already applied. This will allow you to go over the plaster as little as possible to create a smooth surface.
Avoid Overworking Your Plaster
Overworking your plaster on the first coat should be avoided as it will start to burnish the first coat when you do not want that to happen. The base coats should be smooth, but avoid going over them too much. Rather, once it dries you can knock off any high points if necessary.
How the Base Coat(s) Should Look
When your first coat is dry it’ll look even in color and you won’t notice many variations in the movement. Plaster usually dries lighter than when it is applied. It’s good to allow your first coat to fully dry before moving on to your second coat. Some plasters require two base coats to build up the finish. Typically the plasters that require two base coats are thinner and shinier such as a Grassello Fino. Classes that require two coats will be applied in the same fashion as the first coat making sure not to over-compress too soon and burnished too early.
Applying Your Final Coat
When your base coat is dry, you will then start to apply your final coat of plaster. You’ll begin by applying this coat in the same fashion as your base coat, but this time you will be compressing the Venetian plaster as you apply, sometimes referred to as applying “tight”. The idea with your final coat is to fill in all the small variations in your plaster and create a smooth finish. Although some plasters might be smoother than others your final coat should be generally smooth across the surface. Again, you will want to work from dry to wet, applying the plaster back into the plaster you already applied. Additionally, you will want to stop every few feet to burnish your plaster. Burnishing your plaster gives it its final finish and you want to burnish while it is still slightly wet, so make sure to stop before your plaster completely dries on your final coat.
How to burnish
Burnishing is the process of applying pressure with a steel trowel on the surface of your plaster. This creates friction between the plaster and your trowel, which brings out the shine of the plaster. Depending on your plaster, this may create a dull shine or be super shiny. This all depends on the type of plaster and how much you burnish the surface. You want to make sure to burnish from multiple directions and compress the plaster back into itself so that you have an even smooth finish. Running your hand across the wall is a great way to feel and make sure that your plaster finish is smooth. If you feel any rough spots you can then go and burnish extra to make sure you have a uniform finish.
How to seal and protect
Although your plaster may have a nice natural shine, sealing and protecting your plaster is always recommended. Plaster is a naturally porous surface and will absorb any liquids or moisture that it comes in contact with. This could be from the oils on your hand, to a spilled drink or water splashing out of a sink. Protecting Venetian and polished plaster with a sealer is a great way to ensure that your plaster will stay clean and will last for a long time. A natural type of plaster sealer known as Soapstone is a great way to add a base level of protection on your plaster. Soapstone or soap is essentially just that– soap. This reacts with the plaster and creates a natural sealant that helps protect against any absorption while retaining a nice look. For shiny Venetian plasters, such as Grassello Fino, you may opt for a product called cera wax. Cera wax has a higher shine so it’ll match the shiny plaster better, although you can use cera wax for any Venetian plaster products.
Final Thoughts
Venetian plaster offers something that other finishes simply cannot. The variety, texture, and options you have in applying Venetian plaster is unmatched by any other plaster or surface finish. Because Venetian and polished plaster is so historical, it offers a timeless look that can last a lifetime. Modern plasters also offer options for unique looks and bold statement options. Although plaster may be more expensive and time-consuming to apply compared to painting, Venetian plaster can give life to your walls and make your home cozy and inviting.


Check out the before and after of our bathroom renovation. We decided to do a dark Venetian plaster for the walls and update a few of the details. We kept it pretty simple but are so happy with how it turned out…